We know how important it is to work closely with your team and clients, so we created Teamwork and Approvals.The easiest way to work together to create, approve, and post beautiful content for internal teams and external clients.
Here’s a quick guide to get you started.
-
For existing customers:
If the approval workflow isn’t currently active on your account, please reach out to us via live chat, and our team will be happy to enable it for you. -
For new Grow and Accelerate plan customers:
The approval workflow is automatically enabled when you sign up.
Settings will be the best place to start. You’ll see the following default approval statuses have been added to make things easy.

From here you can edit the labels (status names), colors for quick visual cues, and add/remove statuses to meet the unique needs of your team. You can have as few or as many as you'd like.
Once you create content, it will be auto-assigned to your default status. From there, your team can update statuses accordingly, from marking ready to review all the way through to approval. Once content is approved, there’s no additional work required, it will automatically go live at the time you’ve selected!

Internal Comments and External Notes.
We've added a clear separation between what your team sees, and what is shown to your reviewers
Switch between private Internal Comments for your team and reviewer-visible External Comments with a single click.
Crystal-clear communication
The default message is always Internal, preventing any accidental client-facing messages.
External notes are color-coded and easy to spot, so the right people always see the right message—no more mix-ups.
The toggle will reset to internal after a successful External Comment is posted.
Mention and notify
Tag teammates in comments to get their attention, and keep everyone on the same page.
To mention a user, type @ followed by their name. This is a specific thread for each post. You can write messages to your internal team here, see the status change history, and comments your customers leave when a change is requested on an external approval link.
When you’re mentioned in a comment, you’ll get an email like this:

And a notification on your dash like this:

You can go straight to the post from the notification email by clicking open post in Sked at the bottom of the email.

- External Notes are visible in your external review portal, while Internal Comments stay private for your team.
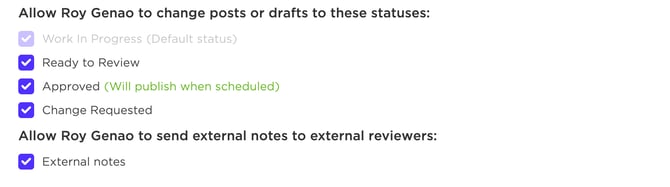
- You can limit which Post Statuses team members can view, as well as their ability to leave External Notes within their user settings.
Allow [User] to send external notes will allow or block a user from sharing any external note globally on Sked, and the toggle will be disabled for them in the Teamwork window.
External Approvals
If you’re using approvals for client approval by external customers (those without access to Sked) you can generate a live URL for each customer on Upcoming Posts, Drafts, or Archive using the button 'View/edit review links'.
When you click 'Approvals' on the left-hand side of the dash you'll be taken to your external review settings. Where you can create themes and store links for each and every client/account. Here's a snapshot of what you'll see:

When you select 'New link' you'll simply fill in the fields for each set of accounts you'd like included on that review link:

Scroll down and set the Status Configuration. You can now add emails to be notified when statuses change and set restrictions for external reviewers
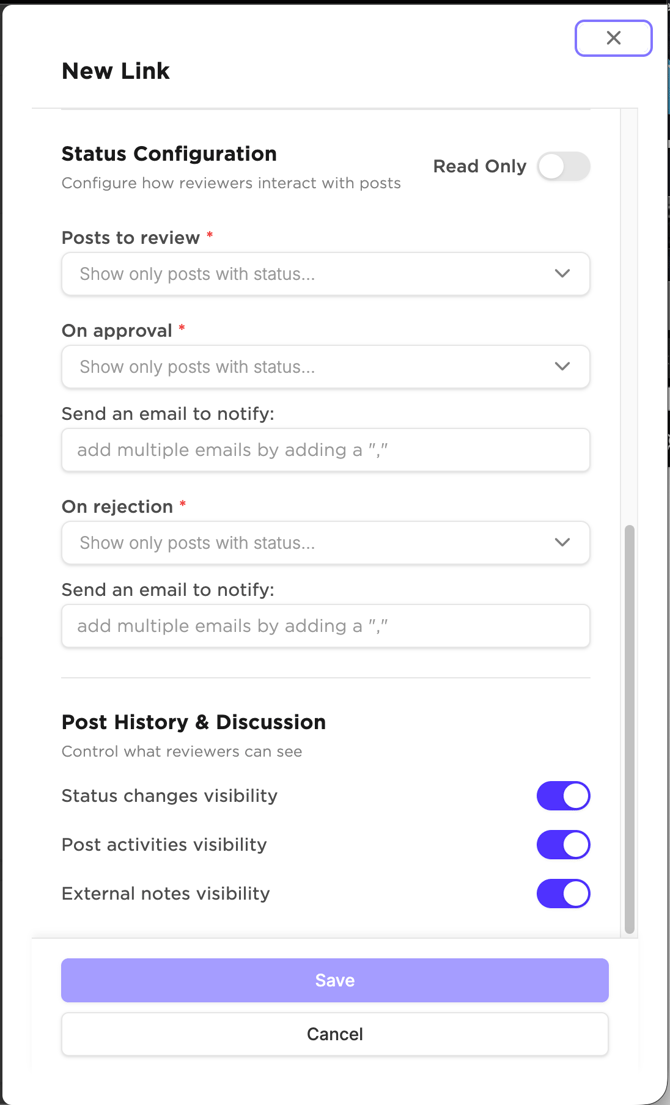
Status changes visibility will show or hide the Approval Steps changes from a review link
Post activities visibility will show any activity that the post has gone through to External Reviewers.
External notes will allow external notes to be shown on a link, and overrides any external notes shared to the link. Note that disabling External Notes on a link won't block external comments being published within the teamwork comments pane, it will only prevent them from being shown on a given link.
Once done, click Save and you're ready to go.
From there, send the link to your clients for approval of mobile friendly views of each post across all social platforms.
External Review
The external link contains a full portal for your reviewers to not just approve their posts, but it's now a permanent place to view their upcoming posts on a content calendar alongside items that need approval.
Upcoming Posts
A list of all posts is features on the left hand side, with coloured visual indicators to highlight any action that needs to be taken:
Green - The post is already approved
Yellow - The post has a review pending
Red - The post has been reviewed, and changes are required.
For items that are pending review, users can Approve or Request changes from the marked boxes on the right-hand side and can leave feedback for items where changes are being requested.
Calendar View
Your reviewers have access to a live content calendar, giving them the perfect overview of their coming months. Posts that need approval are marked in yellow, and approved posts are green.
Reviewers can refer back to the calendar whenever they need a refresher on what's coming up on their social. If a reviewer requests changes on a post and leaves feedback in the chat box, you'll see that feedback in your Sked Dash, inside the post.
Quick tip: The customer comment is italicized and red so you can quickly see why the content wasn’t approved.

Shared calendar for when content doesn't require approval

If you'd like to share content with a client that doesn't require approval, you can use our permanent shared calendar option to easily showcase what's upcoming in a calendar or feed view. This option can be enabled while creating/editing your external review link by selecting the Read Only option.

Important things to note:
-
The reviewer will not be able to approve/request changes to posts with read only content calendars.
-
Viewers will not be able to see collaboration comments and status changes.
One last thing! If you have any existing upcoming content, make sure to mark it with the ‘Approved’ status to ensure it goes live as planned. Now let’s give it a try!