
This guide covers Notion, Asana, Trello, and ClickUp. These four work the same way in Sked, just with different names for a few things (see the table below). This workflow also covers Monday.com, or view that integration's article instead.
A note on terminologyEach tool organizes ideas a little differently. Sked's setup screen uses generic labels ("Projects") that map to whatever your tool actually calls its containers:
|
In Sked |
Trello |
Asana |
Notion |
ClickUp |
|---|---|---|---|---|
|
Project |
Board |
Project |
Page |
List / Space |
Whichever term your tool uses, the setup flow in Sked is identical.
Before you start
Have the board, project, page, or list you want to sync already set up in your tool, with a clear title/name field and (ideally) some kind of status field — this makes the mapping steps below much easier.
Step 1: Open the integration
- Click your profile icon in the top right, then choose Settings.
- Select Integrations from the settings menu.
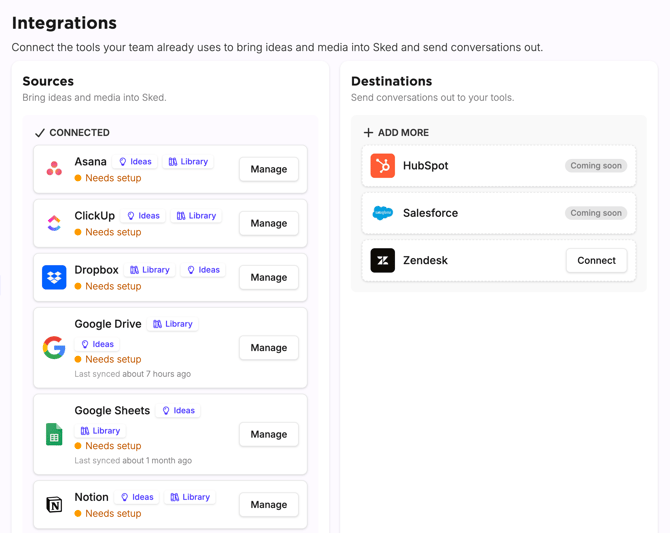
- Under Sources, find your tool (Notion, Asana, Trello, or ClickUp) and click Connect or Manage.
Step 2: Choose where ideas come from and where they land
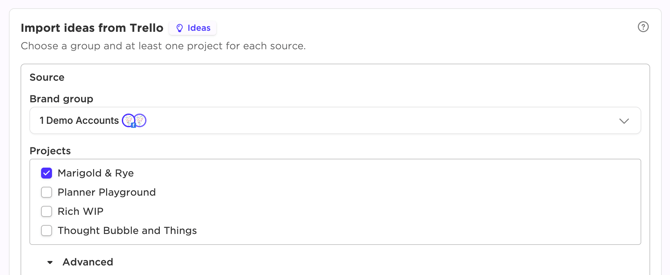
On the integration's page, go to Import ideas from [Tool] (the Ideas tab is selected by default).
- Under Source, choose the Brand group — this is the destination side: which brand's Ideas in Sked you're importing into.
- In the Projects list, tick the board/project you want to pull ideas from.
You can select more than one — Sked supports many-to-one, one-to-many, and many-to-many syncing. If you have several boards feeding one brand's ideas, or one board feeding several brands, tick as many as you need here, and use Add another source (Step 6) to bring in sources from a different brand group entirely.
Step 3: Map the fields
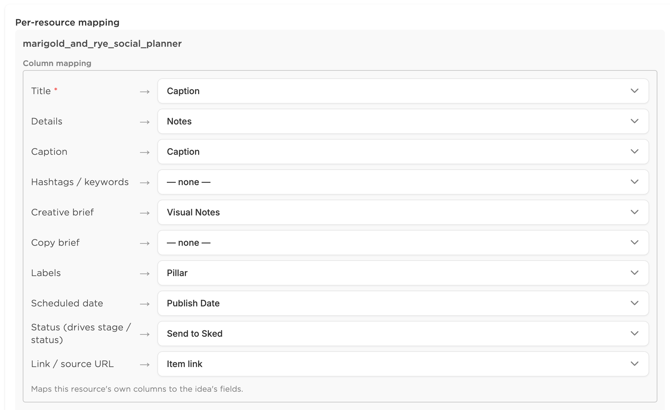
Expand Advanced to reveal Per-resource mapping for each project you selected. Use the dropdowns under Column mapping to match each Sked idea field to the equivalent field in your tool:
|
Sked field |
What it's for |
|---|---|
|
Title * |
Required. The idea's name in Sked. |
|
Details |
Longer internal notes or a summary of the idea. |
|
Caption |
The post copy. |
|
Hashtags / keywords |
Hashtags or keywords for the post. |
|
Creative brief |
Visual direction for whoever creates the asset. |
|
Copy brief |
Direction for whoever writes the copy. |
|
Labels |
Maps to a label/tag on the idea in Sked. |
|
Scheduled date |
The date the idea is intended to publish. |
|
Status (drives stage / status) |
The field that determines what stage the idea lands in — see Step 5. |
|
Link / source URL |
A link back to the source card/task/page. |
The exact fields available in each dropdown come from your tool — for Trello, for example, you'll see options like Title, Description, Status, Labels/tags, Due date, Item link, Start date, Created date, Board name, and Members. Leave any Sked field you don't have a matching source field for set to — none —.
Step 4: Set the sync filter

Under Sync to Sked, you can choose a field to act as a gate for which items get imported.
- If the field is a checkbox, only items that are marked for sync are imported. Anything else — including blank — is skipped. If the field is a property or text, value
- Leave this set to — don't filter — to import every item.
This is handy if your team drafts or triages ideas in the tool before they're ready to move into Sked.
Step 5: Set status routing
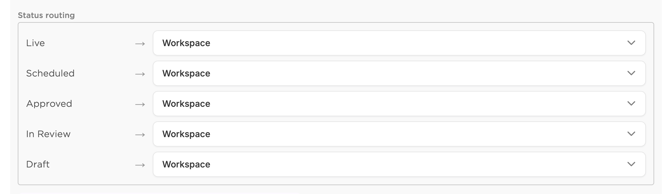
Under Status routing, map the status values your tool uses (for example Draft, In Review, Approved, Scheduled, Live) to where each one should land in Sked — typically the Idea Pad or a Workspace.
- Set a status to — don't route — if items in that status shouldn't sync in at all (for example, you might not want anything already marked Live pulled back in).
- Anything not covered by a value here simply won't move — this section isn't required for every team, but it's worth setting deliberately rather than leaving on defaults.
Step 6: Check the example, set the initial import window, and save
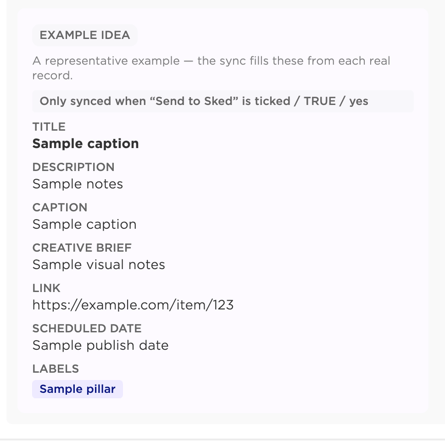
- Example idea shows a live preview of how one of your actual items will map into Sked's fields, based on your mapping — use it to sanity-check before your real data syncs.
- Initial import controls how far back the first sync reaches (for example, "Last 30 days"). Every sync after that is incremental — it only picks up what's new or changed, so this setting only matters once.
- If you have more sources to add — another board, another brand group, another combination — click Add another source and repeat Steps 2–5 for it. Each source gets its own brand group, projects, and mapping, and you can remove one later if needed.
- When you're done, click Save & sync. This saves your setup and runs the first import immediately.
A note on media
Each of these tools can also be connected as a Library source, to sync attached media (images, files) into Sked's asset library — that's a separate section on the same integration page ("Sync media from [Tool]"), with its own folder and target-collection setup. This guide covers the Ideas side only.
Tips- You can come back to this page any time to change the brand group, projects, mappings, or filters — changes apply on the next sync.
- If a field you expect isn't available in a mapping dropdown, double check it exists and is named clearly in your tool.
- Use Sync to Sked if you want your team to keep triaging or drafting inside the tool itself, and only bring finished ideas across.