
This guide covers Ideas import from RSS, including adding a single feed and bulk-adding several at once.
Before you start
Have the RSS (or Atom) feed URL ready — usually something like https://example.com/feed or https://feeds.example.com/section. If you're not sure a site has one, you can paste the site's own URL in and Sked will try to detect its feed.
Step 1: Open the integration
- Click your profile icon in the top right, then choose Settings.
- Select Integrations from the settings menu.
- Under Sources, find RSS feeds and click Connect (this says Manage instead once at least one feed is already partially set up).
Step 2: Add a feed
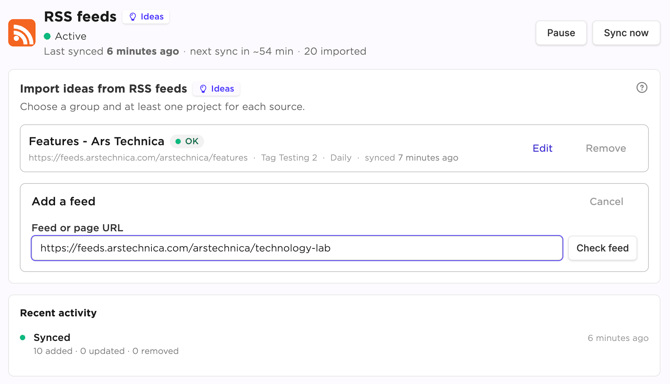
Under Import ideas from RSS feeds, click Add a feed (or Bulk add — see Step 6 — if you're connecting several at once).
- Paste the feed or page URL, then click Check feed. Sked will show you the feed's name, item count, and a few sample headlines so you can confirm it's the right one before going further.
- Under Target group, choose which brand's Ideas this feed should sync into.
Step 3: Set the sync schedule
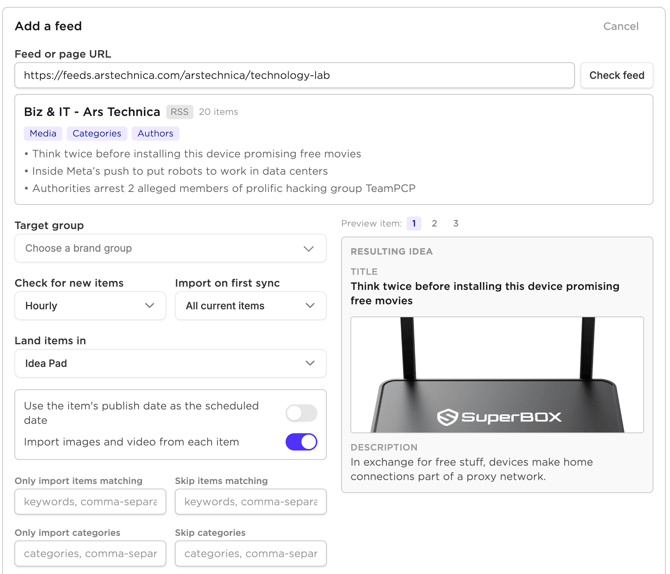
- Check for new items — how often Sked checks the feed for anything new (e.g. Daily).
- Import on first sync — how much of the feed's existing history to pull in the first time (e.g. "Last 10 items" or "All current items"). Every check after that only picks up what's new.
- Land items in — where synced items should land in Sked, typically the Idea Pad.
Step 4: Set item options and filters
Two toggles control what comes across with each item:
- Use the item's publish date as the scheduled date — turn this on if you want the feed's original publish date to set the idea's scheduled date. Leave it off if that's not meaningful for how you'll use the ideas (a lot of feed dates are in the past by the time you see them).
- Import images and video from each item — brings across any media attached to the feed item, not just the text.
If the feed carries more than you want, narrow it down:
- Only import items matching / Skip items matching — comma-separated keywords to include or exclude.
- Only import categories / Skip categories — same idea, but matched against the feed's own categories (only useful if the feed actually sets these).
Use these to pull in only certain products, topics, or content types from a feed that covers more ground than you need.
Step 5: Labels and field mapping
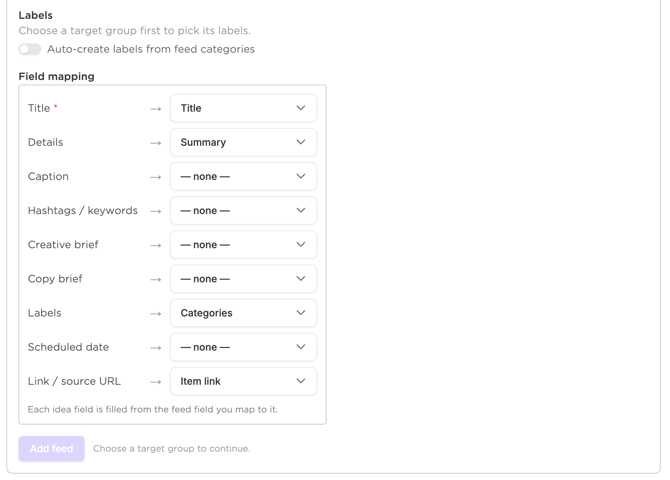
- Labels — manually pick labels to apply to every idea that comes from this feed. This is useful when a whole feed maps to one content pillar or campaign.
- Auto-create labels from feed categories — automatically turns the feed's own categories into labels in Sked. Worth knowing: turning this on lets an external site's categories create new labels in your workspace, so use it deliberately rather than by default.
- Field mapping — same as other Sked integrations, map each idea field (Title, Details, Caption, Hashtags/keywords, Creative brief, Copy brief, Labels, Scheduled date, Link/source URL) to the matching feed field (Title, Summary, Categories, Item link, etc.). Leave anything you don't have a source for as — none —.
Use the Preview item panel on the right to flip through a few real items from the feed and check your mapping looks right before saving.
When you're happy with the setup, click Add feed. Sked saves the feed and starts the first sync straight away — you'll see it listed with a live "Syncing…" status, and its progress under Recent activity.
Step 6: Adding multiple feeds at once (bulk add)If you have several feeds that should all use the same settings, use Bulk add instead of adding them one by one:
- Paste your feed URLs, one per line.
- Click Check all to validate each one — you'll see each feed's detected name and a Ready status once it checks out.
- Configure the target group, sync schedule, options, filters, labels, and field mapping exactly as in Steps 2–5 — these settings apply to every feed in the batch.
- Save. You can always go back and edit or remove any individual feed's settings afterward if one needs to be different from the rest.
Tips 💡
- Each connected feed shows up as its own row with Edit and Remove — you don't need to redo the whole setup to tweak one feed later.
- RSS feeds don't have a "status" field the way a spreadsheet or task tool might, so there's no status routing step here — everything lands in the one destination you set in Step 3.
- Start narrow with keyword or category filters if you're not sure how noisy a feed is — you can always widen it later once you see what's coming through.